Flashing
Welcome to chakky's guide on how to flash P2K phones!
Please make sure your phone is fully charged before
attempting any of this, and, if applicable, that you have
performed a PDS backup. Also ensure you have the appropriate
drivers installed.
━ ⋅✶⋅ ━
Getting Started
First, head to my downloads page and acquire your
preferred version of RSD Lite or PST. I will be covering
how to use both MultiFlashFlex and RSD Lite here. I prefer
to use RSD Lite, though.
━ ⋅✶⋅ ━
RSD Lite

RSD Lite is a program that's built to do one thing and
one thing only: flash, flash, flash! It also can also be
used to flex phones, and has the ability to flash multiple
phones at the same time. It was meant to be used in service
centers, or by Motorola themselves, where technicians would
be working on large batches of phones per day. Pretty cool, huh?
Connect your phone to your computer. You have to do this
first, because otherwise RSD can crash. Once connected, open
RSD Lite, and the phone should pop up on the spreadsheet in
the lower half of the window.
If this is your first time flashing, and you are using
Windows Vista or lower, you may have to manually point your
computer to the P2K drivers before you can continue. See
this page for reference.
Next, select your preferred monster file. For both CDMA
and GSM RAZRs, It is VERY IMPORTANT that you have identified
your exact type variant and chosen a monster pack accordingly.
While some P2K firmwares are cross-compatible (ie. those of the
K1m KRZR and L7c SLVR), others are not, and will just break your
phone.
As for where to obtain monsters, firmware.center
has an excellent selection of them. You can also obtain many
modded ones from the Internet Archive's copy of MotoX.
Once you have selected your monster, click "Start" and let it
do its thing. The phone should reboot to bootloader (if you
haven't already done so) and commence flashing. DO NOT TOUCH
ANYTHING!!! Once it's done, it will reboot into normal mode.
Sometimes, RSD's status can hang after this reboot. If your
phone is operating normally, you can disconnect and close the
application with no risk of damage to the phone.
━ ⋅✶⋅ ━
MultiFlashFlex

MFF is similar to RSD Lite, but older.
MFF is not a standalone program- it's packaged with Motorola
PST, and can be found in its install directory. PST is available
on my downloads page. Make sure you download v7.2.5, with the
dongle bypass patch.
If you want to factory reset the phone's settings after it's
flashed, you can check "Master Clear phones after flashing" and
"Master Reset phones after flexing". This is recommended. You
should also check "Override existing phone software even if it
is newer than the superfile software" to ensure the flash will
still go through even if you're flashing an older firmware version.
Once finished, you should see "Successful FLASH!" and the amount
of time it took in the status area.
━ ⋅✶⋅ ━
Random's Flash & Backup
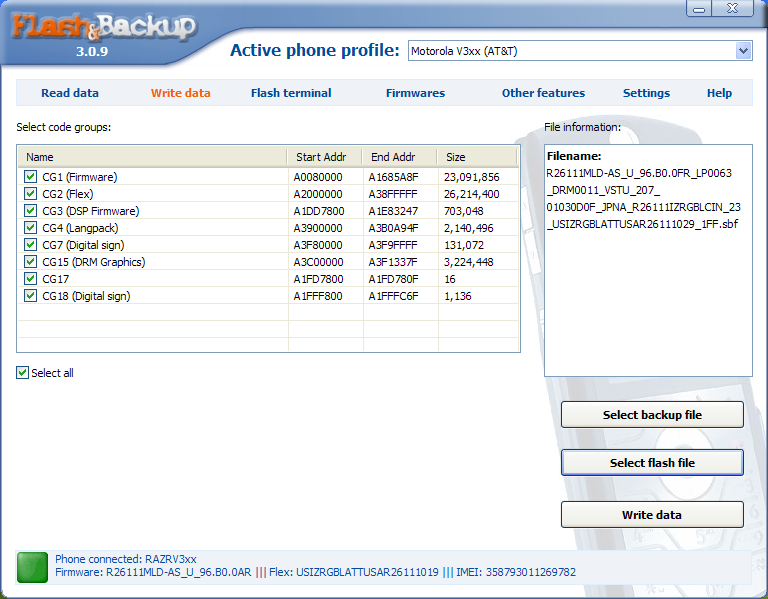
Occasionally, you will come across something that fails to flash
with the official Motorola tools. That is where Random's Flash & Backup
comes in! There are a couple different versions, but 3.0.9, the latest
version, is the most useful.
First, turn your attention to the "Active phone profile:" area at the top
of the window. Select your exact model of phone- pay mind to the exact
hardware variant you have! It'll be listed at the bottom left when you
plug your phone in, next to the big green square. If the square is in-
stead red, unplug it and try again. If your model is not listed, select
"Generic for 3G phones with boot ver. up to 06.10" for Argon phones (V3xx,
RIZR, etc) or "Generic for phones with boot ver. up to 07.D0" for Neptune
LTE2 phones (V3, V3i, etc). Note that FB3 cannot be used to flash CDMA phones.
Next, find the "write data" tab just below the "Active phone profile:"
area. Once you've selected that, make your way to the "Select flash file"
button to flash regular firmware, or "Select backup file" to flash a pre-
viously made backup of your phone. Select the code groups (CG) you'd like
to flash. Usually, you'll just flash the firmware itself (CG1), but you
may also want to change the flex (CG2). Be forewarned, though- this will
erase all of your photos, videos, music, and apps, too!
When you have selected all of the code groups you'll be flashing,
press "Write data" and wait. Once again, don't touch anything! A dialogue
box with a progress bar should appear, and only once the logging area
below it says that it's finished should you unplug the phone.